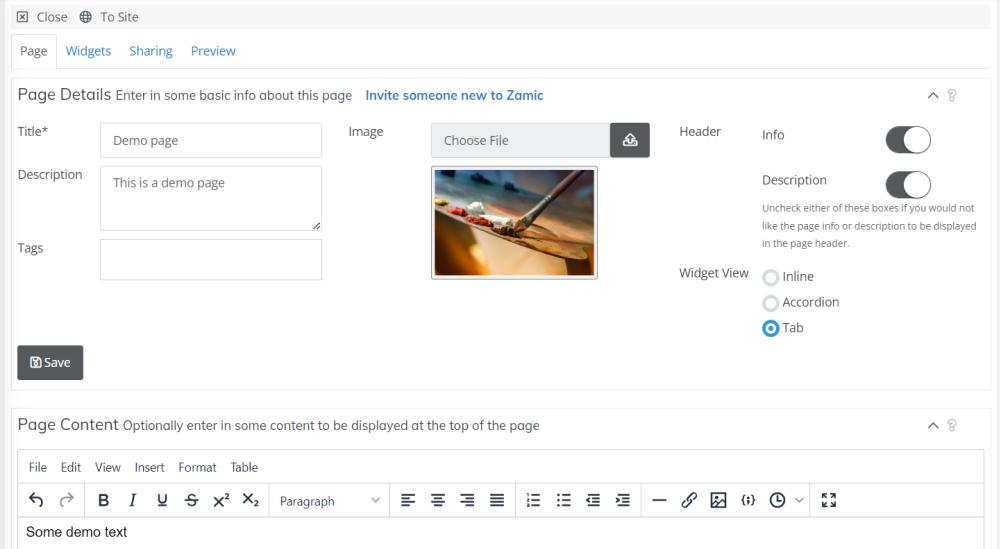
Page Tab
Help with page detailsThe page screen allows you to create a new or update an existing page on the Zamic platform, create widgets, assign permissions and preview what you have created. When you first create a new page, many components including tabs and the content editor are disabled, enter in some text into the title box at a minimum and once you click save all of the components will be enabled.
Page Tab
The page tab is where you enter in basic information about your page which is then displayed in different parts of the platform.
Title
This is the title of the page you are creating. Keep it simple and short.
Description
Enter in a quick run down about the page you are creating. The description will be displayed in the data feeds on different sections of the site. It will also be used for searching and provided to other search engines in reference to your page if it is made public.
Tags
Tags are a list of user defined tags that are relevant to your page. For example you are writing a recipe for BBQ pork, you might add 'BBQ' and 'pork' or even just 'BBQ pork'. Type the tag in and press enter to save. You have the ability to later search tags and when a tag is clicked on, you'll see all relevant pages related to that tag.
Image
The image is a picture used for the page and is usually displayed at the top of the page, in the tags list or within the news feed. If you were writing a recipe, it could be a picture of your dish. If you don't have anything to use, you can download one from www.pexels.com for free or just leave it blank.
Info
When the info checkbox is enabled, the info about the page you have created will be displayed when the page is viewed. This includes things like page views, rating etc. It's useful to disable this when you send your page to a Zamic site when you don't want views, owner details etc. to be shown to the person visiting your site.
Description
When the description checkbox is enabled, the description entered into the description field will be displayed at the top of the page when the page is viewed. It's useful to disable this when you send your page to a Zamic site.
Widget View
This allows you to specify how the widgets are displayed to the person viewing your page. When you have a large number of widgets on your page it may not always be ideal to show all of the widgets at once. Setting to Accordion or Tab mode will group the widgets together.
Inline
Standard widget view, all widgets will be shown from top to bottom
Accordion
Widget titles will be shown from top to bottom, when a user clicks on a widget heading all other widgets are minimized and only the widget clicked on will be shown.
Tab
Widgets are all placed in tabs with the title being the name of each tab. When a user clicks on a tab the corresponding widget is displayed.
Page Content
This is for basic page content that will appear at the top of your page. Enter the content into the editor as you would do with any other text editor and then click the save button at the top of the page.
Widgets Tab
The widgets tab is where you can make the page interactive to yourself and other users on the platform. You are able to add a number of widgets from the widget menu, modify the widget content and change the order of the widgets on the page.
More information is available on the widgets tab here
SharingTab
Page sharing allow you to share your page with other Zamic users or groups that you belong to, have created or publicly set using the Public, Protected, Password Protected options.
You can also change the page owner from this tab and check the permissions for a particular user in your contact list. If you can't find the user in your list, they may not have an account, you can click the 'Invite someone new to Zamic' link to send them an invitation. If it is someone within your organization, you can add the contact directly from the Contacts page.
More information is available on the permissions tab here
Preview
The preview tab allows you to preview the content that you write or the widgets that you create without the need to close the page to view those changes. Each time you click on the preview tab, the latest updates you have made to the page will be shown.
